Appendix A — Downloading an OSF Account
The Center for Open Science recently announced that the Open Science Framework will no longer host closed repositories. It will continue to host open repositories, but will not accept new files. This means researchers who used the Open Science Framework to store closed repositories will need to download them, and host their files elsewhere in the future. This chapter explains how to use Metacheck to download all your OSF data onto your own computer, and how to check what you have before deciding what to do with it.
The easiest way to do this is the hosted Shiny app at https://shiny.ieis.tue.nl/metacheck_osf/, which needs no installation. The rest of this chapter explains how to do the same thing from R, which gives you more control over the download.
Where those files should go next is a separate question, taken up in Uploading Files to Zenodo. You do not need that chapter if you only want a copy of your own repositories.
A.1 Downloading all your private Repositories from the Open Science Framework
The whole process has two steps:
- Create an access token for the OSF.
- Download your OSF projects onto your own computer.
A.2 Before you start
You need R (version 4.3.0 or newer) and, ideally, RStudio. You also need the metacheck package. The functions in this chapter are part of the development version, so install that rather than the stable release. The Setting up Metacheck chapter explains this in full; the short version is that the development version is not available as a pre-compiled binary from R-universe, so install it directly from GitHub, which builds the package from source and therefore needs a compiler (Rtools on Windows, the Xcode command-line tools on macOS, the standard development tools on Linux):
install.packages("pak")
pak::pkg_install("scienceverse/metacheck@dev")
A source install keeps the name metacheck, so you load it with library(metacheck).
You can type commands into the console, which is the panel in RStudio where R shows its output and waits for you to type, or in a new R file, where you can copy paste lines of code, and run them individually, or all together. When this chapter shows a line like osf_pat(), type it into the console or your R file, and press Enter or CTRL+Enter on the line of the code to run it.
Load the package:
A.3 Step 1: Create your access token
An access token is a long string of letters and numbers that proves to a website that a program is acting on your behalf. It works like a password that you give to one specific program, and that you can revoke without changing your real password.
You need one token for the OSF, created here. If you go on to upload the files to Zenodo, that needs its own separate token, explained in Uploading Files to Zenodo.
A.3.1 Why you need an OSF token
Without a token, the OSF allows only 100 requests per hour, only for public OSF projects. Listing all files in a large account uses far more than that, so a download will stop part way through.
With a token, you may make 10,000 requests per day, and you can also reach your own private projects, which are invisible without a Token.
A.3.2 Creating the OSF token
Go to https://osf.io/settings/tokens. If you are not logged in, log in first and then open that link again.
Click the Create Token button.

Give the token a name that will remind you what it is for, such as metacheck. Then tick the osf.full_read scope. This lets the token read everything in your account, including private projects, but not change anything.
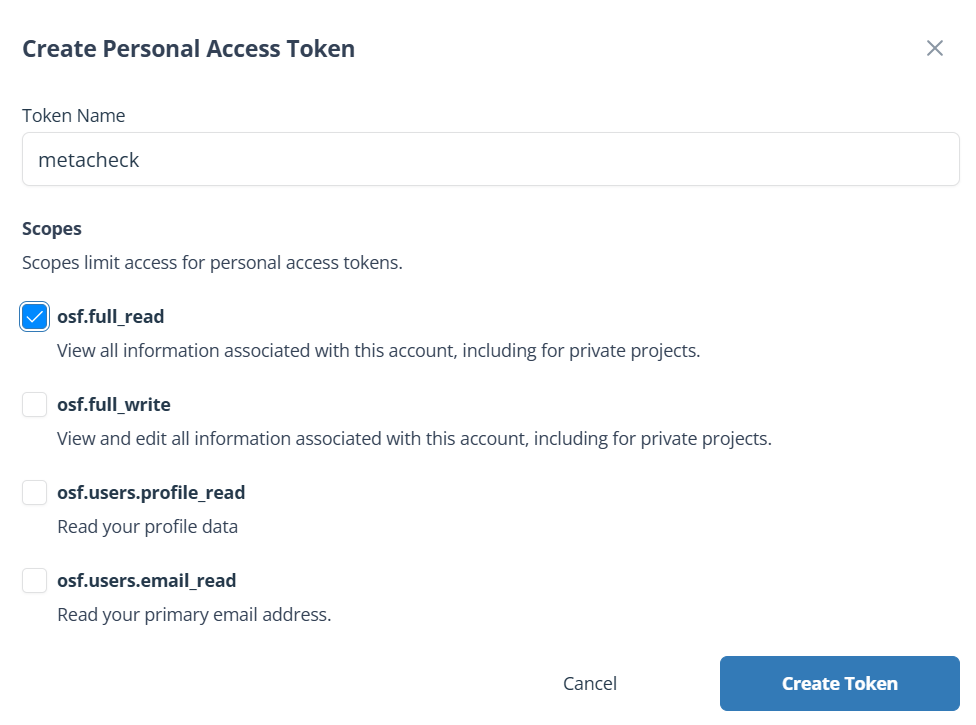
osf.full_read is enough for everything in this chapter, because you are only reading from the OSF and writing to Zenodo. Only tick osf.full_write if you intend to change things on the OSF, which metacheck does not do.
Click Create Token. Your token now appears on screen.
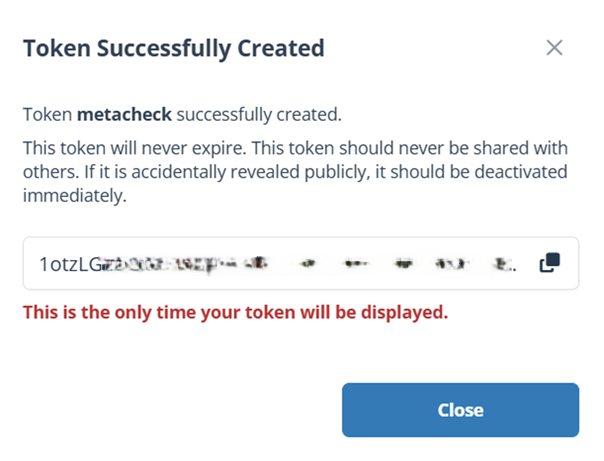
If you navigate away without copying it, you cannot get it back, and you will have to create a new one. Copy it now.
Click the Copy symbol next to the token.
A green bar appears briefly in the top right to confirm the copy succeeded.
A.3.3 Storing the OSF token
Now store the token so that R finds it automatically every time it starts. R reads a file called .Renviron when it starts, and anything in that file becomes available to your session.
Type this in the R console and press Enter:
usethis::edit_r_environ()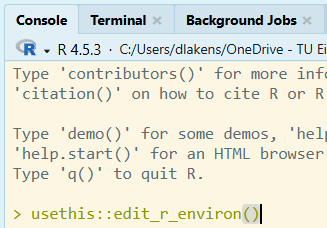
A file called .Renviron opens in the editor. Add this line, replacing the placeholder with the token you copied. Keep the quotation marks:
OSF_PAT="paste-your-token-here"
Save the file with Ctrl+S, then restart R with Ctrl+Shift+F10. The restart matters: .Renviron is only read when R starts, so the token does not exist in your session until you restart.
Check that it worked:
osf_pat()This should print your token. If it prints "" (two quotation marks with nothing between them), the token is not being found. The usual causes are forgetting to restart R, forgetting the quotation marks, or a missing blank line at the end of the file.
If you would rather not store the token in a file, you can set it for the current session:
osf_pat("paste-your-token-here")This is forgotten when you close R.
A.4 Step 2: Download your OSF projects
A.4.1 Finding your OSF user ID
Your user ID is the five-character code in the address of your OSF profile page. Go to: https://osf.io/profile and it will be provided on the screen:

If your profile is at https://osf.io/pct7w, your user ID is pct7w.
A.4.2 Looking at what you have before downloading
It is worth seeing what is there before downloading anything. The code below retrieved all the OSF projects of Daniel Lakens. Unless you have an OSF personal access token of Daniel Lakens, you can only see his public projects. This request can take a while if you have many projects on the OSF:
projects <- osf_user_projects("pct7w")The code returns a table with one row per project and these columns:
| Column | Meaning |
|---|---|
osf_id |
The project’s five-character OSF code |
name |
The project’s title |
category |
What kind of node it is, usually project
|
public |
TRUE if anyone can see it, FALSE if private |
osf_url |
The web address of the project |
An OSF project can contain components, which are sub-projects. These are not listed separately, because downloading a project automatically brings its components’ files with it, however deeply they are nested.
A.4.3 Downloading a single project
You can download a single project, using the code from the osf_id column in the table projects created above:
# just one project, by its code
osf_file_download("8uqfb", download_to = "how_many_registered_studies_are_published")
The name you specify is the folder the download goes into, so make sure the name is meaningful. Inside it, the project gets a folder named after its OSF ID, and each component gets a folder named after the component’s title with its own OSF ID appended, so that two components sharing a title cannot collide and every folder can be traced back to the component it came from. If you enter an ID that does not exist, or one that has been deleted from the OSF, Metacheck will provide a warning.
A.4.4 While you are at it, why not check the repository?
You now have the whole project on your own computer. This is a good moment to look at what you actually shared, because you are about to archive it somewhere permanent, and it is much easier to fix a missing README or an undocumented column now than after the files have a DOI.
Metacheck is designed to assist researchers though automated checks. One way it can do this is by asking users to upload a paper, and it will check if improvements can be made to how research is reported. But in the 0.2.0 version of metacheck, a range of new modules exist that allow users to check data and code in a folder, and automatically suggests improvements to the repository, data, and code.
One line checks the folder you just downloaded:
report_repository("how_many_registered_studies_are_published")This writes a report how_many_registered_studies_are_published_report.html into your working directory. Open it in a browser and read it as a list of suggestions: a missing README to write, a column to document, a stray file to remove. It covers what files are there, what the analysis code looks like, what is in the data, and whether the data columns are documented anywhere. The Creating a Report chapter explains the function and its arguments in full.
Among these checks is a screen for columns that look like they hold email addresses, IP addresses, names, or geographic coordinates. Some of your OSF projects were private precisely because they contain such data. A file published on Zenodo cannot be deleted, so look at this report before you upload anything.
A.4.5 Downloading everything
To download every project the account contains, give the user ID directly:
result <- osf_file_download("pct7w", download_to = "my_osf_archive")That is all you need: everything is downloaded, with no size limits, because this function exists to download a repository in full.
The arguments you may want to change:
-
download_tois the folder to save into. It is created if it does not exist. In this example the files go into the R working directory, in a new folder calledmy_osf_archive. -
modedecides how much work is done before downloading. See the next section; the default is right for archiving your own account. -
max_file_sizeandmax_download_sizeare largest single file and largest total per project, in megabytes. Both areNULLby default, meaning no limit. Set them when you are looking at somebody else’s repository and do not want to pull down their large files. Neither applies in the defaultmode = "all", because there is no file list to filter. -
metadataalso retrieves the parts of a project that are not files. It isTRUEby default; see the section on wikis and logs below. -
max_folder_lengthshortens folder names to a set number of characters. Set it if you are on Windows and the full paths would otherwise exceed the 260-character limit. It has no limit by default. -
ignore_folder_structureputs every file into a single folder instead of reproducing the folders the project had. It isFALSEby default. -
osf_patis your OSF token. You can leave it out if you stored the token in.Renvironas described above; passing it here sets it for the rest of the session.
Each project is saved in a folder named after it, and running the same command again reuses that folder, so nothing is duplicated into a second folder. Whether the second run does less work depends on the mode. In mode = "select" it does: files already on disk at the size the OSF reports are not fetched again, so an interrupted download can simply be repeated and only what is missing is retrieved. In the default mode = "all" it does not: that mode never lists the files, so it has no way of knowing what a component should contain, and it fetches every archive again. Use mode = "select" when the ability to resume matters more to you than speed.
Downloading a whole account means listing every project and fetching every file. For an account with a hundred projects this can take hours and use a lot of disk space. Metacheck makes it easy to download only one of your projects, or a list of some of the projects.
A.4.6 Downloading only some projects
Because osf_user_projects() returns an ordinary table, you can select whichever subset you want and pass it straight back. This is the case that matters most here: public repositories will remain available on the OSF, so the projects you actually need to rescue are the private ones. The public column is FALSE for those, so one line selects them:
# download your private projects (as the OSF will no longer host them)
projects |>
  subset(public == FALSE) |>
  osf_file_download(download_to = "my_private_osf_archive")
A.4.7 The mode argument
By default, osf_file_download will download all files from your repository. This uses the default mode = "all" setting. The OSF can bundle a component’s files into a single compressed archive, so metacheck asks for one archive per component and never lists the individual files.
It is also possible to only download a selection of files. For example, if you already have a back-up of all stimuli, and their file-size is large, you might want to exclude these files from the download. Alternatively, you might want to reduce the size of all downloaded files by only downloading smaller files.
The mode = "select" option lists every file through an individual API call to the OSF. It retrieves information about each file (such as the name, the extension, and the file size), which is what lets you select which files to download, and what max_file_size and max_download_size filter on. Listing all individual files makes downloading large repositories extremely slow. For example, Daniel Lakens was a co-author on Many Labs 2 (OSF id 8cd4r, 44 components and 1,907 files). Listing every file from the Many Labs 2 project takes 63 minutes and 909 API requests, and only then can files be downloaded. Fetching the same project as archives using the default mode = "all" setting retrieved all 1.9 GB of files in under 7 minutes.
There are two further values. mode = "zip" lists the files first, exactly like "select", but then transports whole components as archives; this makes fewer requests than "select", though it is not faster, and its unzip argument decides whether the archives are unpacked after downloading or kept as zip files. mode = "files" is an older name for "select" and is still accepted.
The code below makes these almost 2000 API calls, and subsequently downloads only files smaller than 1 MB, using the mode = "select" option.
# only files under 1 MB, each verified against its reported size
osf_file_download("8cd4r", download_to = "Many_Labs_2",
mode = "select", max_file_size = 1)Files stored on a linked service such as GitHub or Dropbox are not in any OSF archive, so those are still fetched one at a time. They are downloaded, and end up in their own sub-folder.
Without an OSF token, osf_user_projects() only lists the public projects, so subset(public == FALSE) would return nothing. If that selection is empty and you were expecting projects, check osf_pat() returns your token.
The |> symbol is called a pipe. It takes whatever is on its left and passes it as the first argument to the function on its right, which lets you read a sequence of steps from top to bottom.
A.4.8 Wikis, logs, and other things that are not files
An OSF project is often a record as much as data storage The wiki may hold the protocol, the reasoning behind a decision, or the interpretation of the results, and the activity log is the only account of when things changed. None of that is a file, so downloading the files alone would lose it.
Metacheck therefore also retrieves this metadata in wikis and logs by default. Inside each project’s folder you will find an _osf_metadata folder containing:
| File | What it holds |
|---|---|
wiki_<name>.md |
One file per wiki page, as Markdown, so headings and lists survive. Only the current version is saved. |
logs.csv |
The project’s activity log, one row per entry, with the date and what happened |
metadata.json |
Title, description, tags, licence, contributors with their ORCIDs, dates, citation, registrations and forks, exactly as the OSF returned them |
README.md |
A readable summary of all of the above |
A project with no wiki simply has no wiki_ file, and the README.md says so explicitly. This costs about four extra API requests per project. If you want the files only, turn it off:
osf_file_download("pct7w", download_to = "my_osf_archive", metadata = FALSE)A.4.9 Checking that the download worked
When the download finishes, every file that was supposed to arrive is checked against your disk, and against the size the OSF said it should be. This matters when you are archiving hundreds of files in one go.
What the result looks like depends on the mode, because the two modes know different things.
In mode = "all" there is no file listing, so the table has one row per component:
| Column | Meaning |
|---|---|
folder |
The folder this component was saved in, named after its title with its OSF code appended |
osf_project |
The component’s OSF code |
osf_url |
The component’s web address |
title |
The component’s title on the OSF |
files |
How many files arrived in that folder |
bytes |
How much they add up to |
download_path |
The full path of the folder |
downloaded |
TRUE if the component’s archive was retrieved |
# keep the result of the download so you can look at it
# This also makes it easier to upload the files you downloaded to for example Zenodo
result <- osf_file_download("8uqfb", download_to = "how_many_registered_studies_are_published")

# how many files arrived in total, across all components
sum(result$files)

# any component whose archive could not be retrieved
subset(result, !downloaded)
In mode = "select" every file was listed, so the table has one row per file. Alongside the file’s own details (name, size, filetype, provider, and osf_id, which is the file’s ID rather than the project’s), these columns tell you what happened:
| Column | Meaning |
|---|---|
downloaded |
TRUE only when the file is really on disk. For files the OSF stores itself it must also be the size the OSF reported; a file that arrived truncated counts as not downloaded, because a half-file that looks complete is worse than an absent one. |
size_on_disk |
How large the file actually is, in bytes. Comparing it with size shows you why a file failed. |
attempted |
FALSE when you excluded the file with max_file_size or max_download_size. Those are not failures, so they are counted separately. |
path |
Where the file was saved, relative to download_path
|
download_path |
The full path of the folder the project was saved in |
osf_project |
The OSF ID of the project the file came from |
osf_url |
The project’s web address |
If a project links to an external service, the OSF reports the file size it recorded the last time it looked at that service, and that figure goes stale as soon as the file changes there. Those files are therefore checked for presence only, not size. Files the OSF stores itself are checked both ways.
To check everything arrived, keep the result of the download in a variable. These columns only exist in mode = "select", so this example asks for that mode:
checked <- osf_file_download("8uqfb", download_to = "how_many_registered_studies_are_published",
                             mode = "select")

# how many files arrived, out of those that were meant to
sum(checked$downloaded)
sum(checked$attempted)

# list anything that did not arrive
subset(checked, !downloaded & attempted)
If some files are missing, run the same download command again. Occasionally the OSF refuses a request when many arrive at once; Metacheck waits and retries twice automatically, but a file can still be missed on a busy day. In mode = "select" the download resumes into the same folder, so only the missing files are fetched, and you will see a message such as 54 of 57 files from pngda are already on disk and were not downloaded again.
A.5 Where to put the files next
Your projects are now on your own computer. The next question is where they should live, since the OSF will not go on hosting closed repositories.
We recommend Zenodo, and Metacheck can upload your downloaded projects to it directly, taking the title, description, authors, ORCIDs, keywords and licence from the original OSF project. That is the subject of its own chapter: Uploading Files to Zenodo.
The result object returned by osf_file_download() is exactly what the upload functions expect, so the two chapters fit together:
result <- osf_file_download("pct7w", download_to = "my_osf_archive")
result |> zenodo_upload()
Before you upload anything, check what is in the files. A record published on Zenodo cannot be deleted, and some of your OSF projects were private for a reason. Run report_repository() on the download and read the personal-information section of the report, as described earlier in this chapter.
A.6 When something goes wrong
osf_pat() returns "". R cannot find your token. Restart R, then check .Renviron has the line OSF_PAT="..." with quotation marks and a blank line at the end of the file.
The download stops part way, or many files fail. Usually the OSF rate limit. Set an OSF token if you have not, and run the same command again with the same download_to. The folder is reused either way. In mode = "select" files already on disk at the right size are not fetched twice, so only the missing ones are downloaded; in the default mode = "all" every archive is fetched again, because that mode never listed the files and so cannot tell what is already correct.
Some files show downloaded = FALSE. In mode = "select", look at attempted: if it is FALSE you excluded the file yourself with max_file_size or max_download_size, and if it is TRUE the transfer genuinely failed, so run the download again. In mode = "all", downloaded refers to a whole component, so a FALSE there means its archive could not be retrieved.
“could not be found on the OSF” or “has been deleted or withdrawn”. The first means the ID does not exist, so check it against the project’s web address; the second means the project was on the OSF but has since been removed, and its files cannot be recovered.
A private project’s files fail while its file names are listed. The listing and the download are separate requests, and only the listing was authorised. Check osf_pat() returns your token, and that the token has the osf.full_read scope.
For problems with the Zenodo upload itself, see the troubleshooting section of the Uploading Files to Zenodo chapter.